HTML 5 and CSS 3: The Techniques You’ll Soon Be Using
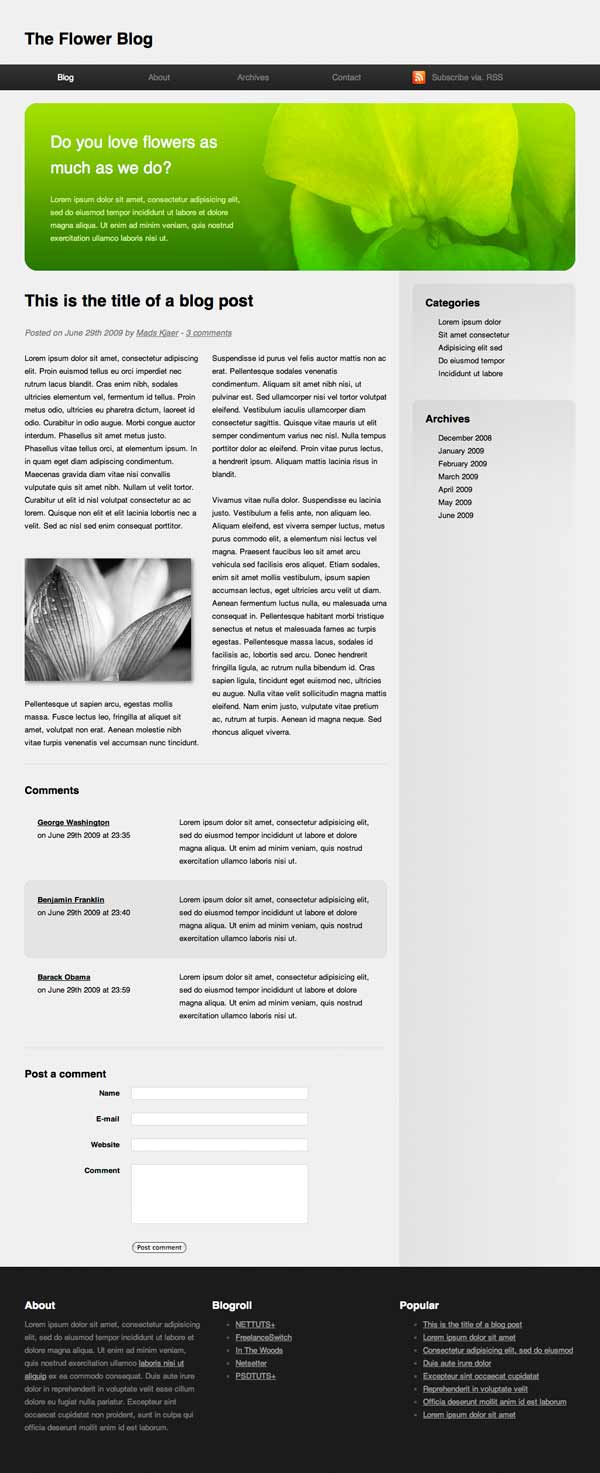
In this tutorial, we are going to build a blog page using next-generation techniques from HTML 5 and CSS 3. The tutorial aims to demonstrate how we will be building websites when the specifications are finalized and the browser vendors have implemented them. If you already know HTML and CSS, it should be easy to follow along.
1. HTML 5
HTML 5 is the next major version of HTML. It introduces a bunch of new elements that will make our pages more semantic. This will make it a lot easier for search engines and screenreaders to navigate our pages, and improve the web experience for everyone. In addition, HTML 5 will also include fancy APIs for drawing graphics on screen, storing data offline, dragging and dropping, and a lot more. Let’s get started marking up the blog page.
2. Basic Structure
Before we begin marking up the page we should get the overall structure straight:

In HTML 5 there are specific tags meant for marking up the header, navigation, sidebar and footer. First, take a look at the markup and I’ll explain afterwards:
- <!doctype html>
- <html>
- <head>
- <title>Page title</title>
- </head>
- <body>
- <header>
- <h1>Page title</h1>
- </header>
- <nav>
- </nav>
- <section id="intro">
- </section>
- <section>
- </section>
- <aside>
- </aside>
- <footer>
- </footer>
- </body>
- </html>
It still looks like HTML markup, but there are a few things to note:
- In HTML 5, there is only one doctype. It is declared in the beginning of the page by <!doctype html>. It simply tells the browser that it’s dealing with an HTML-document.
- The new tag header is wrapped around introductory elements, such as the page title or a logo. It could also contain a table of contents or a search form. Every header typically contains a heading tag from <h1> to <h6>. In this case the header is used to introduce the whole page, but we’ll use it to introduce a section of the page a little later.
- The nav-tag is used to contain navigational elements, such as the main navigation on a site or more specialized navigation like next/previous-links.
- The section-tag is used to denote a section in the document. It can contain all kinds of markup and multiple sections can be nested inside each other.
- aside is used to wrap around content related to the main content of the page that could still stand on it’s own and make sense. In this case we’re using it for the sidebar.
- The footer-tag should contain additional information about the main content, such as info about who wrote it, copyright information, links to related documents and so on.
Instead of using divs to contain different sections of the page we are now using appropriate, semantic tags. They will make it a lot easier for search engines and screen readers to figure out what’s what in a page.
3. Marking Up the Navigation
The navigation is marked up exactly like we would do it in HTML 4 or XHTML, using an unordered list. The key is that this list is placed inside the nav-tags.
- <nav>
- <ul>
- <li><a href="#">Blog</a></li>
- <li><a href="#">About</a></li>
- <li><a href="#">Archives</a></li>
- <li><a href="#">Contact</a></li>
- <li class="subscribe"><a href="#">Subscribe via. RSS</a></li>
- </ul>
- </nav>
4. Marking Up the Introduction
We have already defined a new section in the document using the section tag. Now we just need some content.
- <section id="intro">
- <header>
- <h2>Do you love flowers as much as we do?</h2>
- </header>
- <p>Lorem ipsum dolor sit amet, consectetur adipisicing elit, sed do eiusmod tempor incididunt ut labore et dolore magna aliqua. Ut enim ad minim veniam, quis nostrud exercitation ullamco laboris nisi ut.</p>
- </section>
We add an id to the section tag so we can identify it later when styling. We use the header tag to wrap around the introductory h2 element. In addition to describing a whole document, the header-tag should also be used to describe individual sections.
5. Marking Up the Main Content Area
Our main content area consists of three sections: the blog post, the comments and the comment form. Using our knowledge about the new structural tags in HTML 5, it should be easy to mark it up.
Marking up the Blog Post
Go through the markup and I’ll explain the new elements afterwards.
- <section>
- <article class="blogPost">
- <header>
- <h2>This is the title of a blog post</h2>
- <p>Posted on <time datetime="2009-06-29T23:31:45+01:00">June 29th 2009</time> by <a href="#">Mads Kjaer</a> - <a href="#comments">3 comments</a></p>
- </header>
- <p>Lorem ipsum dolor sit amet, consectetur adipiscing elit. Proin euismod tellus eu orci imperdiet nec rutrum lacus blandit. Cras enim nibh, sodales ultricies elementum vel, fermentum id tellus. Proin metus odio, ultricies eu pharetra dictum, laoreet id odio...</p>
- </article>
- </section>
We start a new section and wrap the whole blog post in an article-tag. The article tag is used to denote an independent entry in a blog, discussion, encyclopedia, etc. and is ideal to use here. Since we are viewing the details of a single post we only have one article, but on the front page of the blog we would wrap each post in an article-tag.
The header element is used to present the header and metadata about the blog post. We tell the user when the post was written, who wrote it and how many comments it has. Note that the timestamp is wrapped in a

- The year followed by a figure dash (a minus sign to you non-typography nerds)
- The month followed by a figure dash
- The date
- A capital T to denote that we are going to specify the local time
- The local time in the format hh:mm:ss
- The time zone relative to GMT. I’m in Denmark which is 1 hour after GMT, so I write +01. If you were in Colorado you would be 7 hours behind GMT, and you would write -07.
Marking up the Comments
Marking up the comments is pretty straight-forward. No new tags or attributes are used.
- <section id="comments">
- <header>
- <h3>Comments</h3>
- </header>
- <article>
- <header>
- <a href="#">George Washington</a> on <time datetime="2009-06-29T23:35:20+01:00">June 29th 2009 at 23:35</time>
- </header>
- <p>Lorem ipsum dolor sit amet, consectetur adipisicing elit, sed do eiusmod tempor incididunt ut labore et dolore magna aliqua. Ut enim ad minim veniam, quis nostrud exercitation ullamco laboris nisi ut.</p>
- </article>
- <article>
- <header>
- <a href="#">Benjamin Franklin</a> on <time datetime="2009-06-29T23:40:09+01:00">June 29th 2009 at 23:40</time>
- </header>
- <p>Lorem ipsum dolor sit amet, consectetur adipisicing elit, sed do eiusmod tempor incididunt ut labore et dolore magna aliqua. Ut enim ad minim veniam, quis nostrud exercitation ullamco laboris nisi ut.</p>
- </article>
- </section>
Marking up the Comment Form
Several enhancements to forms have been introduced in HTML 5. You longer have to do client-side validation of required fields, emails, etc. The browser takes care of this for you.
- <form action="#" method="post">
- <h3>Post a comment</h3>
- <p>
- <label for="name">Name</label>
- <input name="name" id="name" type="text" required />
- </p>
- <p>
- <label for="email">E-mail</label>
- <input name="email" id="email" type="email" required />
- </p>
- <p>
- <label for="website">Website</label>
- <input name="website" id="website" type="url" />
- </p>
- <p>
- <label for="comment">Comment</label>
- <textarea name="comment" id="comment" required></textarea>
- </p>
- <p><input type="submit" value="Post comment" /></p>
- </form>
There are new two new types of inputs, email and url. Email specifies that the user should enter a valid E-mail, and url that the user should enter a valid website address. If you write required as an attribute, the user cannot submit an empty field. “Required” is a boolean attribute, new to HTML 5. It just means that the attribute is to be declared without a value.
more http://net.tutsplus.com/tutorials/html-css-techniques/html-5-and-css-3-the-techniques-youll-soon-be-using/
Комментариев нет:
Отправить комментарий